


15
Jun
Jun
Uncategorized
Free pattern: Mary Hawkins´s Scissor Keeper Sampler
Modèle gratuit: la pochette pour ciseaux de Mary Hawkins
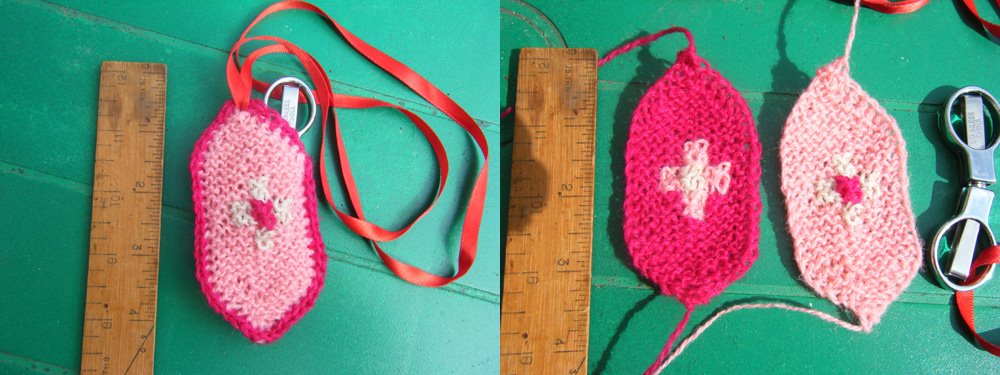
My prior aim when writing my book was to preserve the old tradition of inserts that was being lost, but also to give it a new life. That´s why when, on another island, the Great Britain, Mary Hawkins of the Knitting & Crochet Guild came up with a pattern for a Scissor Keeper Sampler, as a mean of presenting the inserts to her knitting group, I thought this aim had partially been reached. And I was very glad.
Mary was so kind to share this pattern, quick and easy to realize, with us.
Le but principal de mon livre de tricot était de préserver la vieille tradition des semelles islandaises, mais surtout de lui insuffler une nouvelle vie. Aussi, lorsque sur une autre île, la Grande Bretagne, Mary Hawkins présente à son groupe de tricot de l´ Association de Tricot & Crochet (Knitting & Crochet Guild of Great Britain) les vieilles semelles sous la forme d´une pochette pour ciseaux, vite tricotée, je me dis que mon but est partiellement atteint. Et je suis très fière.
Mary a la gentillesse de partager avec nous ce modèle facile et rapide à réaliser et m´a autorisée à le traduire en français.
Scissor Keeper Sampler
Pattern after Mary Hawkins of the Knitting & Crochet Guild of Great Britain
www.knitting-and-crochet-guild.org.uk
Pairs of folding scissors cost less than £2 in the UK. Buy these first, so you know the size you are aiming for! Mine measured 8cm folded. The Keeper is not so suitable for sharp points unless heavily felted. Use three colours of wool A, B and C. Because of the small size of this, the sample is knitted from tip to tip, and the colours are carried across the back of the work and caught in on the following row.
Front – Cast on 3 stitches any method in colour A
First row – Knit into front and back of first stitch (kfb), knit 1, purl last stitch
Second row – slip first stitch, kfb, knit 1, purl last
Third row – slip first stitch, kfb, knit 2, purl last.
Continue like this until you have 12 sts.
Keep slipping first stitches and purling last, knit straight for 8 rows, (4 garters/ridges).
Now introduce your colours: work 5A, knit 2B, work 5A for 4 rows (2 garters/ridges). Work 3A, 2B, 2C, 2B, 3A for 4 rows (2 garters/ridges). Work 5A, 2B, 5A for 4 rows (2 garters/ridges). Break off colours B and C. Work 8 rows/4 garters/ridges in colour A.
Decrease rows – slip 1, knit 1, knit 2 together, knit to last stitch and purl it.
When you get down to 4 stitches, slip 1, knit 2 together, purl last stitch. Cast off last 3 stitches.
Back – make the same, changing order of colours
Decide on the colour for the edging, and join to the piece of the other colour. Do double crochet (single crochet US) from roughly the 3 o’clock position on this piece, i.e. where the slope starts, one double crochet in every slipped stitch. When you reach the tip, place the backing underneath, wrong sides together, and crochet through both layers. When you get back to the starting position, crochet through the back piece only up to the tip. Tie a length of ribbon through one end of scissors and through a stitch at the top of the Keeper.
Pochette pour ciseaux pliants
Modèle de Mary Hawkins de l´Association de Tricot & Crochet de Grande Bretagne (Knitting & Crochet Guild of Great Britain).
www.knitting-and-crochet-guild.org.uk
Une paire de ciseaux coûte moins de £2 en Grande Bretagne. Le modèle convient pour des ciseaux mesurant 8 cm repliés. La pochette ne convient pas pour des ciseaux pointus sauf à être feutrée. Utilisez 3 couleurs de laine A, B et C. Parce qu´elle est toute petite, la pochette est tricotée d´une pointe à l´autre et les fils sont laissés flottés derrière l´ouvrage puis tricotés avec au rang suivant.
Devant : Montez 3 mailles avec la couleur A.
1er rg : Tric. 2 m. dans la 1ère m. (tric. dans le devant et l´arrière de la m.), 1 m. end., dernière m. á l´env.
2ème rg : Glissez la 1ère m., tric. 2 m. dans la m. suivante, 1 m. end., dernière m. à l´env.
3ème rg : Glissez la 1ère m., tric. 2 m. dans la m. suivante, 2 m. end., dernière m. à l´env.
Continuez ainsi jusqu´à ce que vous ayez 12 m.
Tric. alors tout droit 8 rgs (= 4 rgs mousse). Tric. toujours en glissant la 1ère m. et en tric. la dernière m. à l´env.
Travaillez les couleurs : tric. 5 m. avec la couleur A, 2 m. avec la couleur B et 5 m. avec la couleur A pendant 4 rgs (= 2 rgs mousse). Ensuite 3A, 2B, 2C, 2B, 3A pendant 4 rgs (= 2 rgs mousse). puis à nouveau 5A, 2B, 5A pendant 4 rgs (= 2 rgs mousse). Couper les fils B et C. Tric. tout droit 8 rgs (= 4 rgs mousse) avec la couleur A.
Diminutions : glisser la 1ère m., 1 m. end., tric. 2 m. ens., tric. jusqu´à la dernière m. et tric la à l´env. Continuez ainsi ts les rgs jusqu´à ce qu´il reste 4 m.: glisser la 1ère m., tric. 2 m. ens., dernière m. à l´env. Rab. les 3 m. restantes.
Dos: Procédez de la même façon mais en intervertissant les couleurs.
Assemblez le devant et le dos bord à bord avec un tour crocheté de la couleur de votre choix en faisant des m. serrées dans chacune des m. glissées. Commencez à crocheter le devant de la pochette, là où la pointe commence (position 3 heures), jusqu´au sommet de la pointe. Crochetez alors le devant et le dos ensemble jusqu´au point de départ. Crochetez ensuite simplement le dos jusqu´au sommet de la pointe. Accrocher un ruban à la pointe de la pochette et l´autre bout du ruban aux ciseaux.